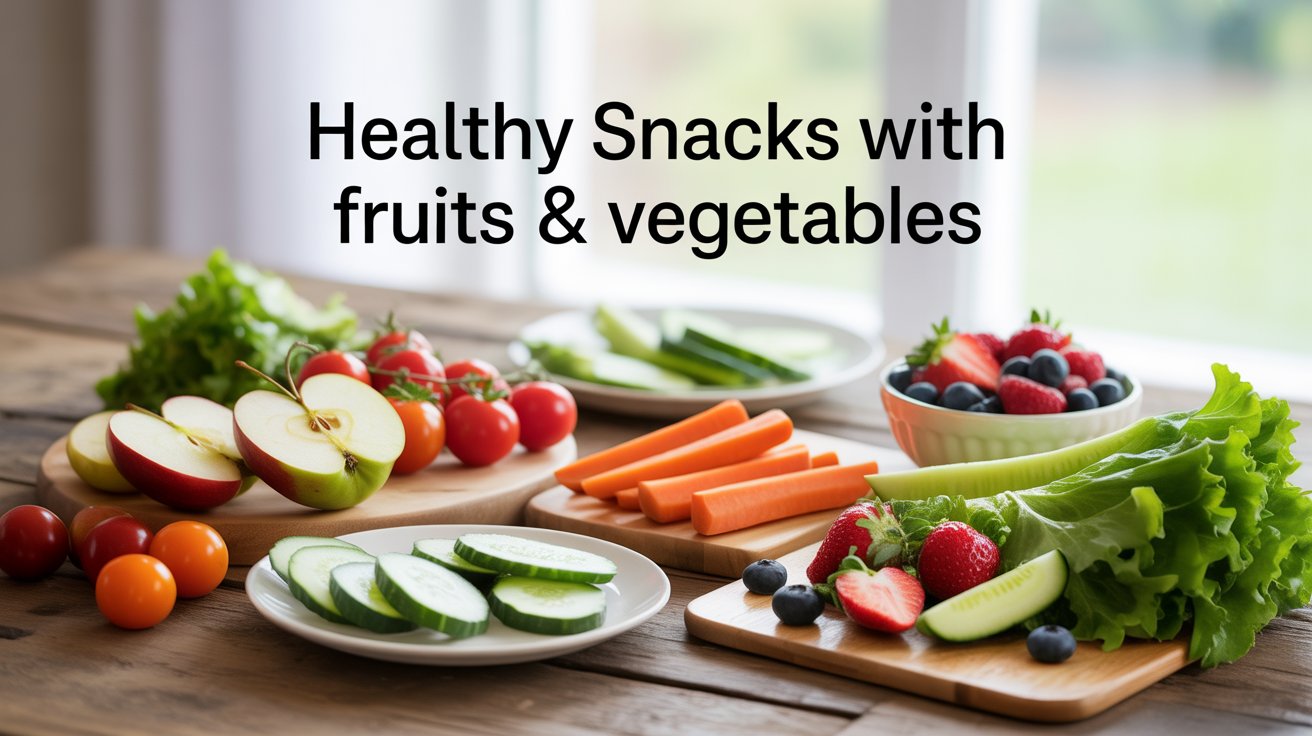
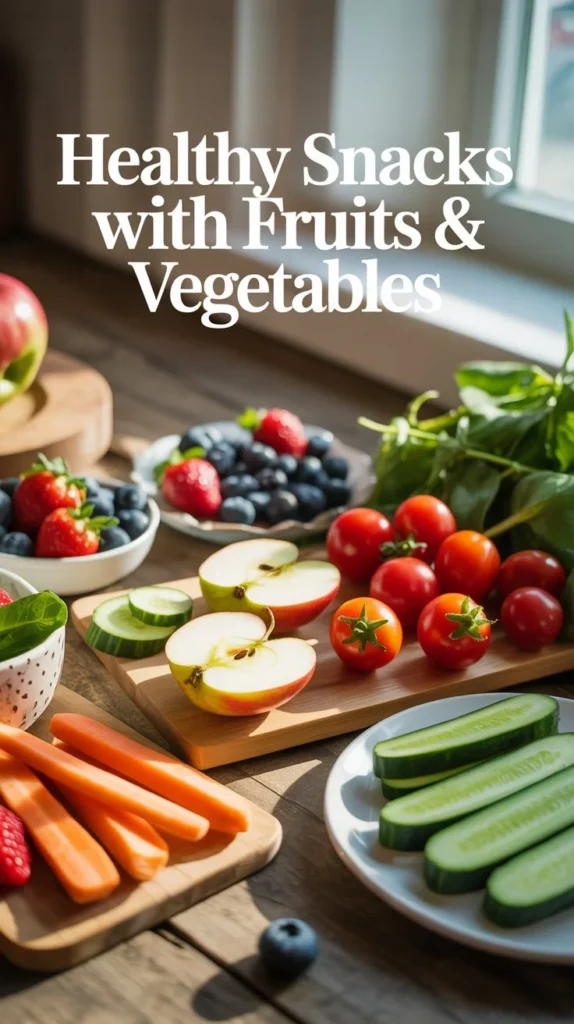
Healthy snacks with Fruits and Vegetables
Why Fruits and Vegetables Make the Best Snacks
Your body runs better on real food between meals. Fruits and vegetables deliver vitamins, minerals, and fiber that processed snacks can’t match. An apple gives you 4 grams of fiber and natural sugars that release energy slowly. A cup of cherry tomatoes provides vitamin C and lycopene for just 27 calories. These whole foods fill your stomach because they contain water and fiber that expand inside you. Your hunger stays satisfied for hours instead of returning 30 minutes after eating chips or cookies.
Your energy levels stay consistent when you snack on produce. Candy and crackers spike your blood sugar fast, then crash it down just as quickly. This rollercoaster leaves you tired and reaching for more junk food. Fruits and vegetables release their natural sugars gradually, keeping your brain alert and your mood stable. You avoid the afternoon slump that sends people running for coffee and chocolate. Plus, produce costs less per serving than packaged snacks and never contains artificial colors, preservatives, or ingredients you can’t pronounce.
Also Check: Best Mediterranean diet recipes
Quick Vegetable Snacks
Vegetables turn into satisfying snacks when you prepare them right. These recipes take 10 minutes or less to make and give you crunchy, savory bites that beat any bag of chips. You can prep most of these options on Sunday and grab them all week long. Each snack provides vitamins and minerals your body actually needs. Start with the recipes that use vegetables you already enjoy eating.
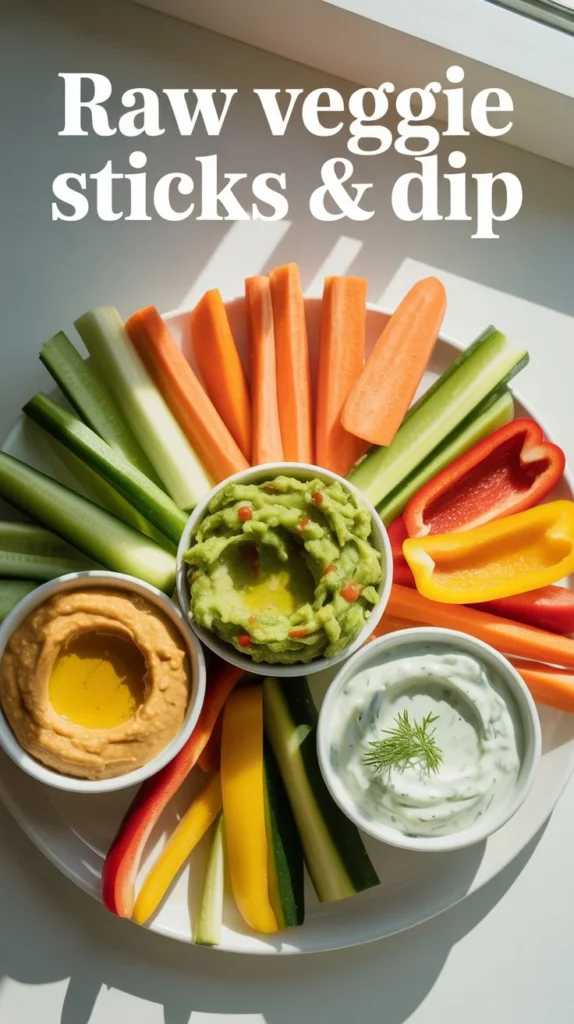
1.Raw Veggie Sticks & Dip
Raw veggie sticks with dip are the ultimate healthy snack that’s as simple as it is satisfying. This no-cook recipe is perfect for busy weekdays, party appetizers, or anytime you need a quick, nutritious bite. Crisp, colorful vegetables paired with creamy dips like hummus, guacamole, or tzatziki create a delicious combination that’s packed with vitamins, fiber, and flavor. Whether you’re looking for a light lunch, an after-school snack for kids, or a crowd-pleasing platter for gatherings, this versatile recipe comes together in minutes and can be customized with your favorite vegetables and dips. Plus, with proper storage, you can prep these veggie sticks in advance and have healthy snacks ready to grab throughout the week.
Ingredients:
- Carrots
- Cucumbers
- Bell peppers
- Celery
- Hummus, guacamole, or tzatziki
Recipe Steps:
Step 1: Wash the Vegetables: Wash all vegetables thoroughly under cold running water to remove any dirt or residue from the surface.
Step 2: Prepare the Carrots: Peel the carrots if desired, then trim off both ends. Cut them lengthwise into halves or quarters, then slice into uniform sticks about 3 inches long and half an inch thick.
Step 3: Prepare the Cucumbers: Trim the ends off the cucumbers and cut them in half lengthwise. If using regular cucumbers with large seeds, scoop out the seedy center. Slice each half into strips about 3 inches long and half an inch thick.
Step 4: Prepare the Celery: Separate and wash the celery stalks individually, paying attention to the base. Trim off the leafy tops and bottom ends. Cut into sticks about 3 inches long and half an inch wide.
Step 5: Prepare the Bell Peppers: Cut around the stem and remove the core. Slice the pepper in half vertically and remove all seeds and white membrane. Lay each half flat and slice into strips about half an inch wide and 3 inches long.
Step 6: Arrange the Vegetables: Place vegetable sticks standing upright in a tall glass or arrange them flat on a serving plate, organizing by color or type for an attractive presentation.
Step 7: Serve with Dip: Spoon your chosen dip into a small bowl and place it in the center of your vegetable arrangement for easy access.
Step 8: Store Leftovers: Store leftover vegetables in an airtight container with a damp paper towel. Refrigerate for up to 5 days to maintain freshness and crispness.
2.Caprese Skewers
Caprese skewers are a delightful Italian-inspired appetizer that brings together fresh tomatoes, creamy mozzarella, and aromatic basil in bite-sized form. These colorful skewers are visually stunning and incredibly easy to prepare, making them perfect for parties, picnics, or elegant gatherings. With no cooking required, this recipe celebrates fresh, high-quality ingredients and takes just minutes to assemble. The combination of juicy cherry tomatoes, soft mozzarella balls, and fragrant basil, enhanced with olive oil and balsamic vinegar, creates a refreshing and sophisticated snack that impresses every time.
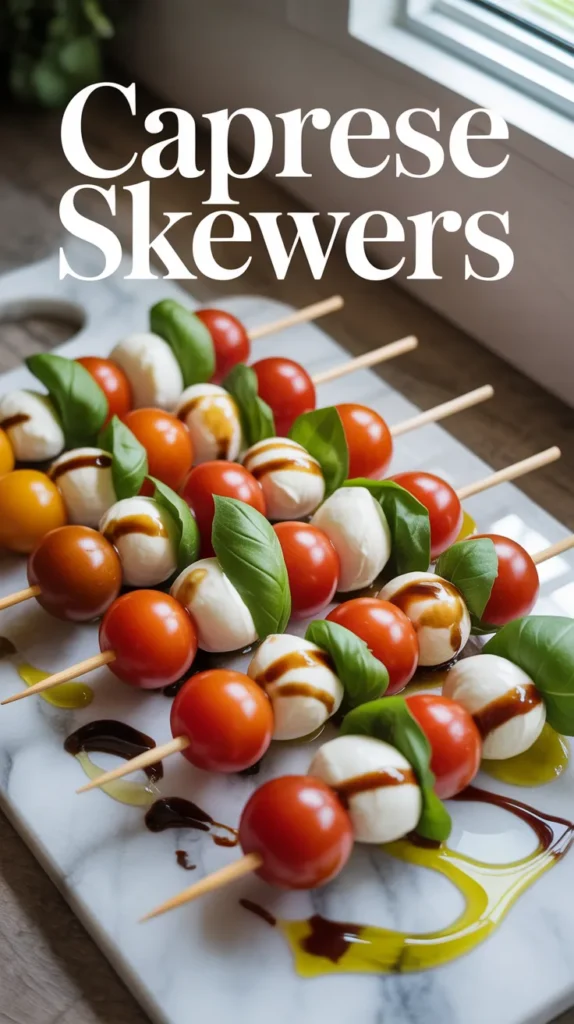
Ingredients:
- Cherry tomatoes
- Mozzarella balls (bocconcini)
- Fresh basil leaves
- Olive oil
- Balsamic vinegar
- Wooden skewers
Recipe Steps:
Step 1: Assemble the Skewers
Thread one cherry tomato onto a wooden skewer. Fold a fresh basil leaf in half and slide it onto the skewer next to the tomato. Add a mozzarella ball after the basil. Repeat this pattern of tomato, basil, and mozzarella until you have 3 to 4 complete sets on each skewer.
Step 2: Add Flavor
Arrange the finished skewers on a serving platter. Drizzle olive oil generously over all the skewers, followed by a drizzle of balsamic vinegar for a sweet and tangy contrast. Optionally, sprinkle with salt and freshly cracked black pepper.
Step 3: Serve
Serve the Caprese skewers immediately at room temperature for best flavor, or refrigerate for up to 2 hours if preparing in advance. Enjoy as a beautiful and delicious appetizer.
3.Cucumber Bites
Cucumber bites are a light, refreshing, and elegant appetizer that’s perfect for any occasion. These crisp cucumber rounds topped with creamy cheese and savory smoked salmon offer a delightful combination of textures and flavors in every bite. This no-cook recipe is incredibly simple to prepare yet looks impressive enough for sophisticated gatherings, cocktail parties, or special celebrations.
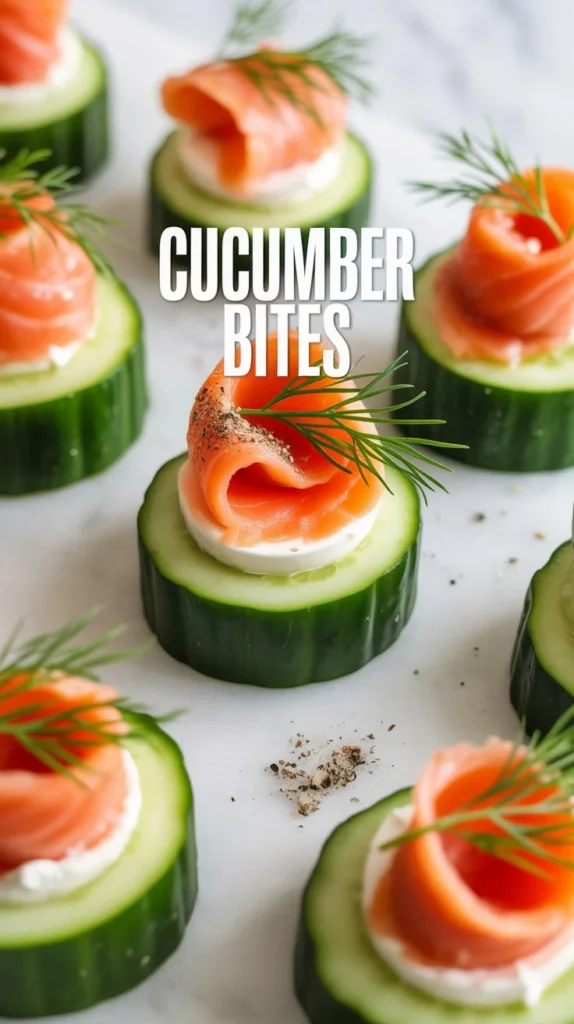
The cool crunch of fresh cucumber paired with rich cream cheese, delicate smoked salmon, and a bright hint of lemon creates a perfectly balanced appetizer that’s both healthy and satisfying. Whether you’re hosting a brunch, looking for a low-carb snack, or need an easy crowd-pleaser, these cucumber bites come together in minutes and are sure to be a hit.
Ingredients:
- Large cucumber
- Cream cheese
- Smoked salmon or dill
- Lemon juice
- Black pepper
Recipe Steps:
Step 1: Slice the Cucumber
Wash the cucumber thoroughly under cold running water. Cut the cucumber into rounds about half an inch thick, keeping the slices as uniform as possible for even presentation. Pat each slice dry with a paper towel to remove excess moisture so the cream cheese will stick better and stay in place.
Step 2: Top Each Slice
Spread about a teaspoon of cream cheese on each cucumber round, creating an even layer that covers most of the surface. Place a small piece of smoked salmon on top of the cream cheese, folding or arranging it attractively. Squeeze a tiny bit of fresh lemon juice over each bite to add brightness and enhance the flavors.
Step 3: Season and Serve
Sprinkle each cucumber bite with a pinch of freshly cracked black pepper for added flavor and visual appeal. Arrange the finished bites on a serving platter and serve immediately, or refrigerate for up to 1 hour before serving to keep them fresh and crisp.
Also Check: Soup recipes easy and quick
4.Stuffed Peppers
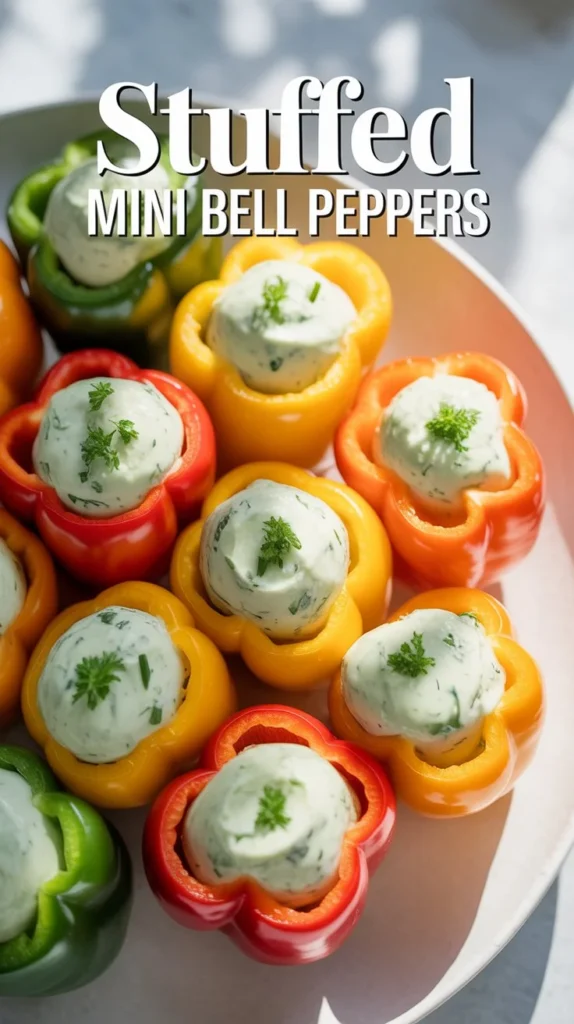
Stuffed mini bell peppers are a colorful, bite-sized appetizer that’s both visually appealing and bursting with flavor. These vibrant pepper halves filled with creamy, herb-infused cheese make a perfect finger food for parties, potlucks, or casual gatherings. With their naturally sweet and crunchy texture, mini bell peppers provide the ideal vessel for a rich, savory filling that’s enhanced with fresh herbs and aromatic garlic. Whether you’re entertaining guests or preparing a healthy snack for the week, these stuffed peppers offer a delicious combination of fresh vegetables and creamy cheese that everyone will enjoy.
Ingredients:
- Mini bell peppers
- Cream cheese or ricotta
- Herbs (chives, parsley, or basil)
- Garlic powder
- Salt
Recipe Steps:
Step 1: Slice the Peppers: Slice each mini bell pepper in half lengthwise down the middle, creating two boat-shaped halves from each pepper.
Step 2: Clean the Peppers: Using a small spoon, carefully scoop out all the seeds and white membranes from inside each pepper half. Rinse the pepper halves under cold water to remove any remaining seeds, then pat them completely dry with a paper towel.
Step 3: Make the Filling: In a small mixing bowl, combine the cream cheese or ricotta with finely chopped fresh herbs of your choice. Add a pinch of garlic powder and salt to taste. Stir the mixture together until all ingredients are evenly combined and smooth.
Step 4: Fill the Peppers: Using a small spoon or piping bag, fill each pepper half generously with the cheese mixture, creating a neat mound on top. Make sure each pepper is filled evenly for consistent flavor and appearance.
Step 5: Chill and Serve: Arrange the stuffed peppers on a serving plate and refrigerate for at least 30 minutes to allow the flavors to blend and the filling to set. Store any leftovers in a covered container in the refrigerator for up to 2 days.
Roasted Veggies
Roasted vegetables are a simple yet incredibly flavorful side dish that transforms ordinary veggies into caramelized, crispy perfection. This easy recipe brings out the natural sweetness of broccoli, cauliflower, and Brussels sprouts through high-heat roasting, creating deliciously golden-brown, crispy edges that even vegetable skeptics will love.
Whether you’re looking for a healthy weeknight dinner side, meal prep option, or a crowd-pleasing dish for holiday gatherings, these roasted veggies are versatile, nutritious, and incredibly satisfying. The simple seasoning of salt and your choice of paprika or garlic powder enhances the vegetables’ natural flavors without overwhelming them, making this recipe a go-to favorite that pairs beautifully with any main course.
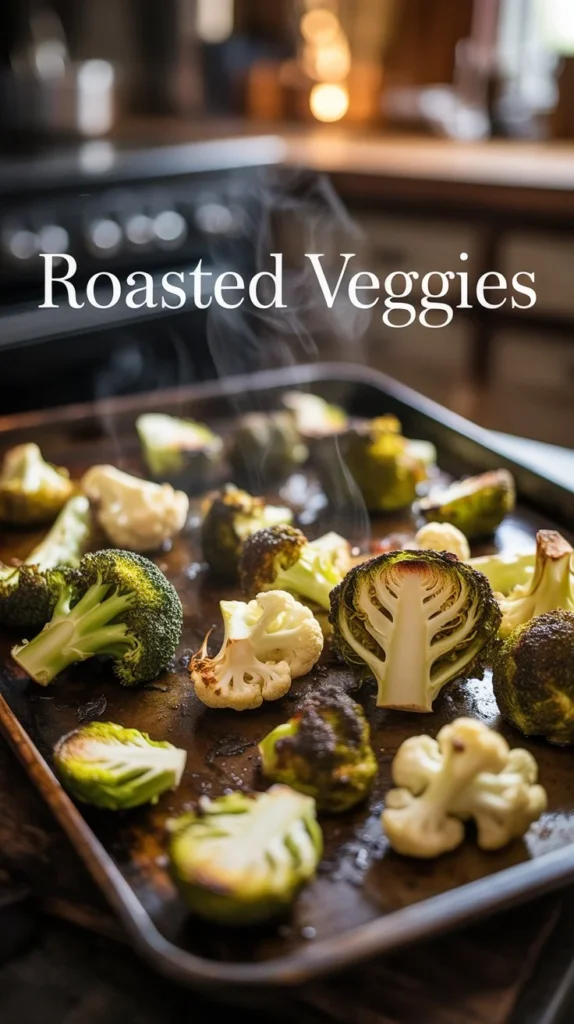
Ingredients:
- Broccoli florets
- Cauliflower pieces
- Brussels sprouts
- Olive oil
- Salt
- Paprika or garlic powder
Recipe Steps:
Step 1: Prep the Vegetables Heat your oven to 425°F. Cut broccoli and cauliflower into bite-sized pieces, keeping them roughly the same size for even cooking. Trim the ends off the Brussels sprouts and cut them in half lengthwise. Place all the prepared vegetables in a large mixing bowl.
Step 2: Season and Coat Drizzle 2 tablespoons of olive oil over the vegetables in the bowl. Sprinkle generously with salt and add your chosen spice—either paprika or garlic powder. Use your hands to toss everything together thoroughly, ensuring each piece gets evenly coated with the oil and seasonings.
Step 3: Arrange on Baking Sheet Spread the seasoned vegetables in a single layer on a large baking sheet. Make sure not to overcrowd them, leaving some space between pieces so they roast properly rather than steam. If necessary, use two baking sheets to avoid crowding.
Step 4: Roast Until Crispy Place the baking sheet in the preheated oven and roast for 20 to 25 minutes, flipping the vegetables halfway through the cooking time with a spatula. The vegetables are done when they turn golden brown with crispy, caramelized edges.
Step 5: Cool and Serve Remove the baking sheet from the oven and let the roasted vegetables cool for 5 minutes before serving. This allows them to firm up slightly and makes them easier to handle. Serve warm as a healthy and delicious side dish.
Fresh Fruit Snacks
Fresh fruit gives you natural sweetness without any added sugar or weird ingredients. These snacks take just a few minutes to put together and taste like treats your taste buds will love. Fruit fills you up with fiber and water, so you stay satisfied longer than eating candy or baked goods. Each option delivers vitamins that support your skin, immune system, and energy levels. Pick fruits you already like, then try new combinations as you get more comfortable.
1.Colorful Fruit Combinations
Colorful fruit skewers are a fun, vibrant snack that makes eating fresh fruit exciting and visually appealing. These rainbow-patterned treats are perfect for parties, picnics, or healthy desserts, offering a delightful mix of textures and flavors from juicy watermelon, tangy pineapple, sweet strawberries, and crisp grapes. Quick to assemble and packed with vitamins and natural fiber, these portable skewers are ideal for kids and adults alike.
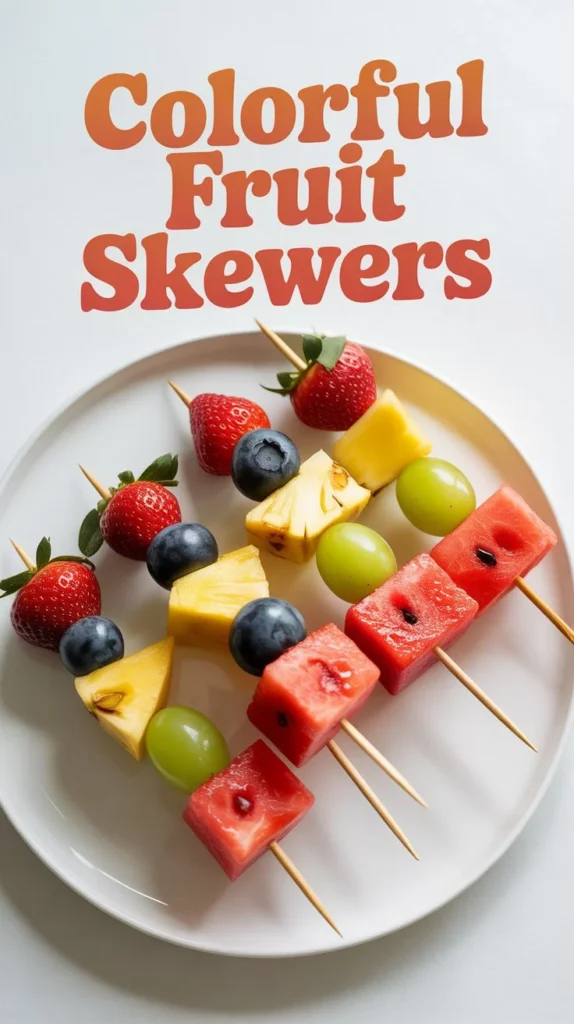
Ingredients:
- Watermelon chunks
- Strawberries
- Blueberries
- Pineapple pieces
- Grapes
- Wooden skewers
Recipe Steps:
Step 1: Wash the Berries Wash all berries thoroughly under cool running water to remove any dirt or residue. Pat them dry gently with a clean kitchen towel or paper towels.
Step 2: Cut the Larger Fruits Cut the watermelon and pineapple into uniform cubes about 1 inch in size. Remove the stems from the strawberries and cut any large berries in half to match the size of the other fruit pieces.
Step 3: Thread onto Skewers Push one piece of each fruit onto a wooden skewer, creating a colorful pattern. Try arranging them as: watermelon, strawberry, pineapple, blueberry, then grape.
Step 4: Make Multiple Skewers Repeat the threading process to make 6 to 8 fruit skewers, following the same colorful pattern for consistency and visual appeal.
Step 5: Arrange and Serve Arrange the finished fruit skewers on a serving plate. Eat them right away for the freshest taste, or cover with plastic wrap and refrigerate for up to 4 hours if preparing in advance.
2.Creamy Fruit Parfaits and Bowls
Creamy fruit parfaits and bowls are a delicious, protein-packed snack that combines tangy Greek yogurt with sweet fresh berries and crunchy toppings. These layered treats are visually appealing and incredibly satisfying, providing a perfect balance of creamy, fruity, and crunchy textures in every spoonful. The Greek yogurt delivers protein to keep you full and energized, while fresh berries add natural sweetness, vitamins, and antioxidants.
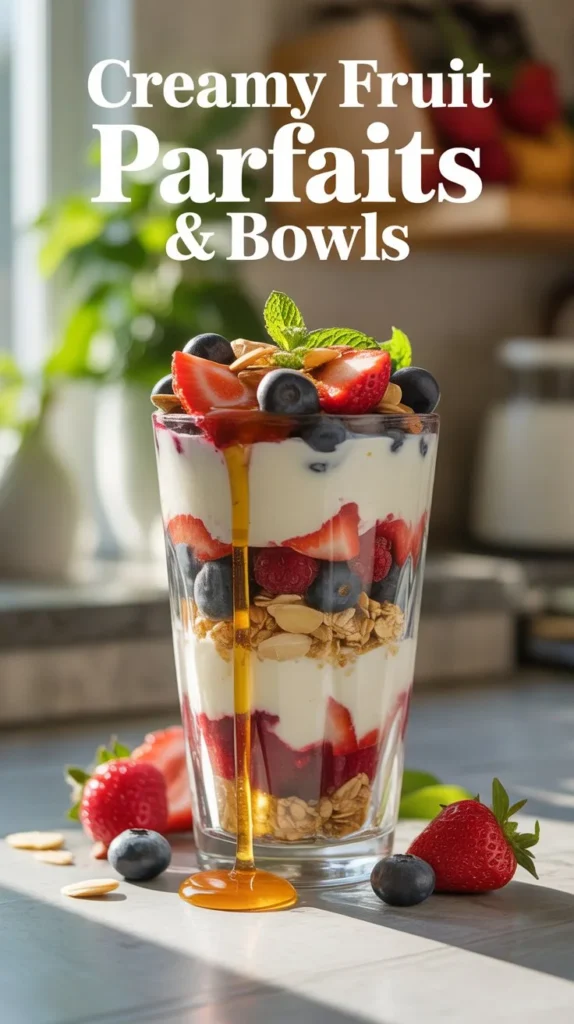
A drizzle of honey enhances the flavors, and the granola with sliced almonds provides delightful crunch along with healthy fats and fiber. Whether you’re looking for a quick breakfast, afternoon snack, or healthy dessert, these parfaits are easy to prepare in just minutes and can be customized with your favorite fruits and toppings.
Ingredients:
- Plain Greek yogurt
- Fresh berries (strawberries, blueberries, raspberries)
- Honey
- Granola
- Sliced almonds
Recipe Steps:
Step 1: Layer the Base Spoon 3 tablespoons of plain Greek yogurt into the bottom of a clear glass or bowl. The thick yogurt provides a protein-rich base that keeps you full.
Step 2: Add First Fruit Layer Place a generous handful of mixed fresh berries on top of the yogurt layer. Use a combination of strawberries, blueberries, and raspberries for best flavor and color.
Step 3: Drizzle with Honey Drizzle a small amount of honey (about half a tablespoon) over the berries to add natural sweetness.
Step 4: Repeat Layers Add another 3-tablespoon layer of Greek yogurt on top of the berries, followed by another handful of mixed berries. This creates attractive, distinct layers.
Step 5: Add Crunchy Toppings Sprinkle granola and sliced almonds generously on top for crunch. Eat immediately to keep granola crispy, or prep yogurt and fruit layers ahead and add toppings right before eating.
Also Check: Weight gain meals for women
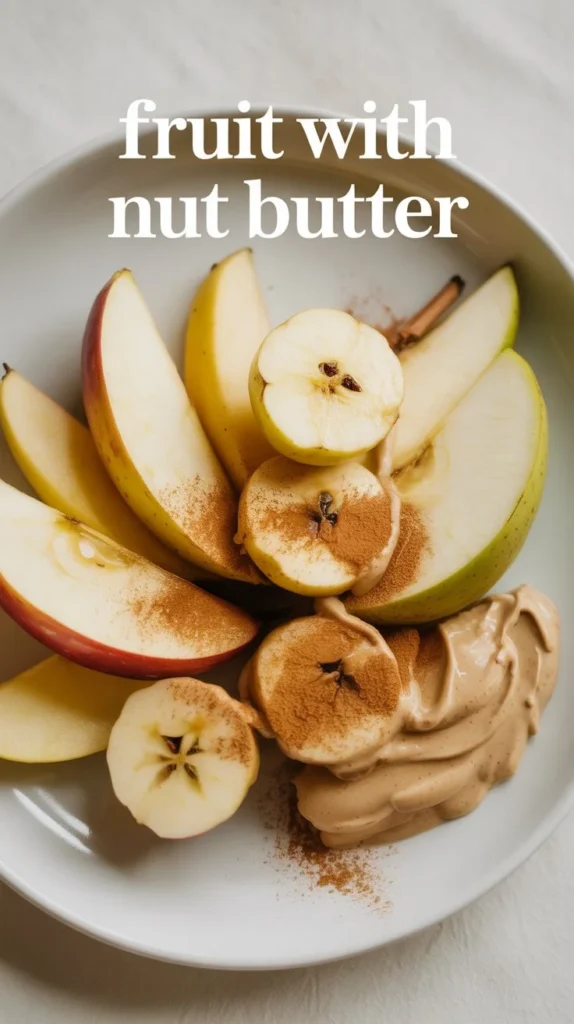
3.Fruit Paired with Nut Butters
Fruit paired with nut butters is a simple, nutritious snack that combines the natural sweetness of fresh fruit with the rich, creamy protein of nut butters. This classic combination provides a perfect balance of carbohydrates, healthy fats, and protein, making it an ideal choice for sustained energy throughout the day. The natural sugars in apples, bananas, and pears give you a quick energy boost, while the nut butter slows down sugar absorption and keeps you satisfied longer. Whether you need a pre-workout snack, an after-school treat, or a quick breakfast addition, this pairing takes just minutes to prepare and offers endless variations.
Ingredients:
- Apples
- Bananas
- Pears
- Almond butter, peanut butter, or cashew butter
- Cinnamon
Recipe Steps:
Step 1: Prepare the Apple Wash the apple thoroughly under cool water. Core the apple to remove the seeds and center, then cut it into wedges about half an inch thick for easy dipping and eating.
Step 2: Prepare the Banana and Pear Peel the banana and slice it into rounds about half an inch thick. Wash the pear, cut it into wedges, and remove the core and seeds from each piece.
Step 3: Spread the Nut Butter Spread a thin, even layer of your chosen nut butter—almond butter, peanut butter, or cashew butter—on each fruit slice. The healthy fats in the nut butter slow down sugar absorption and provide lasting energy.
Step 4: Add Cinnamon Sprinkle a small pinch of cinnamon on top of each nut butter-covered fruit slice for extra flavor and a hint of warmth.
Step 5: Arrange and Serve Arrange all the prepared fruit slices on a serving plate. Eat within 30 minutes to prevent the apple and pear slices from oxidizing and turning brown. For best results, serve immediately.
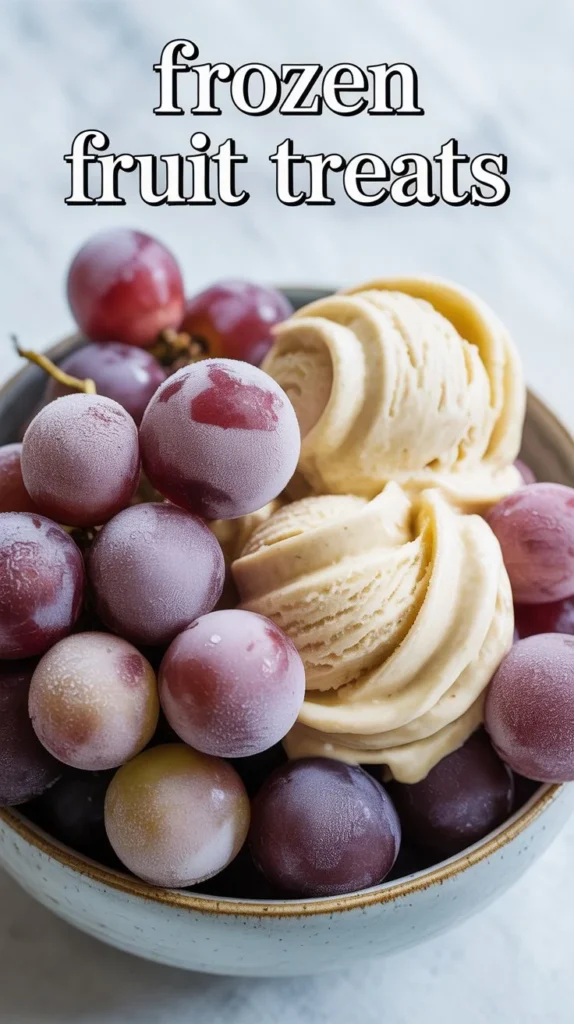
4.Frozen Fruit Treats
Frozen fruit treats are a refreshing, healthy alternative to store-bought ice cream and popsicles with no added sugar or artificial ingredients. These naturally sweet snacks transform ordinary fruit into delightful frozen desserts that satisfy your sweet tooth while providing vitamins and fiber. Frozen grapes become crispy, candy-like bites, while blended frozen bananas create a creamy, soft-serve texture. Perfect for hot days or anytime you crave something cold and sweet, these treats are easy to make and can be prepared in advance.
Ingredients:
- Grapes
- Banana
- Strawberries
- Cocoa powder
- Vanilla extract
Recipe Steps:
Step 1: Prepare and Freeze Grapes Wash the grapes thoroughly and remove them from their stems. Pat them completely dry with a towel to prevent ice crystals. Spread in a single layer on a baking sheet and freeze for 2 hours. Transfer to a freezer bag for storage up to 3 months.
Step 2: Prepare Bananas for Freezing Peel ripe bananas and slice them into coins about half an inch thick. Arrange in a single layer on a parchment-lined baking sheet to prevent sticking.
Step 3: Freeze Banana Slices Place the baking sheet in the freezer for at least 3 hours, or until the banana pieces are completely solid. This ensures they’ll blend into a creamy consistency.
Step 4: Blend into Ice Cream Put frozen banana pieces into a food processor or blender. Add a splash of vanilla extract. Blend on high until smooth and creamy, stopping to scrape down the sides. The mixture transforms into soft-serve ice cream.
Step 5: Customize and Serve Add a tablespoon of cocoa powder while blending for chocolate flavor, or blend in frozen strawberries for a fruity variation. Serve immediately for soft-serve texture, or refreeze for 30 minutes for firmer consistency.
Savory and Sweet Combo Snacks
These recipes mix vegetables and fruits together for interesting flavor combinations. Sweet meets savory in ways that surprise your taste buds and keep snacking exciting. Each option balances natural sugars with fiber and protein so your energy stays steady. You get vegetables and fruits in the same bite, doubling your nutrient intake. Try these when you want something more filling than plain fruit.
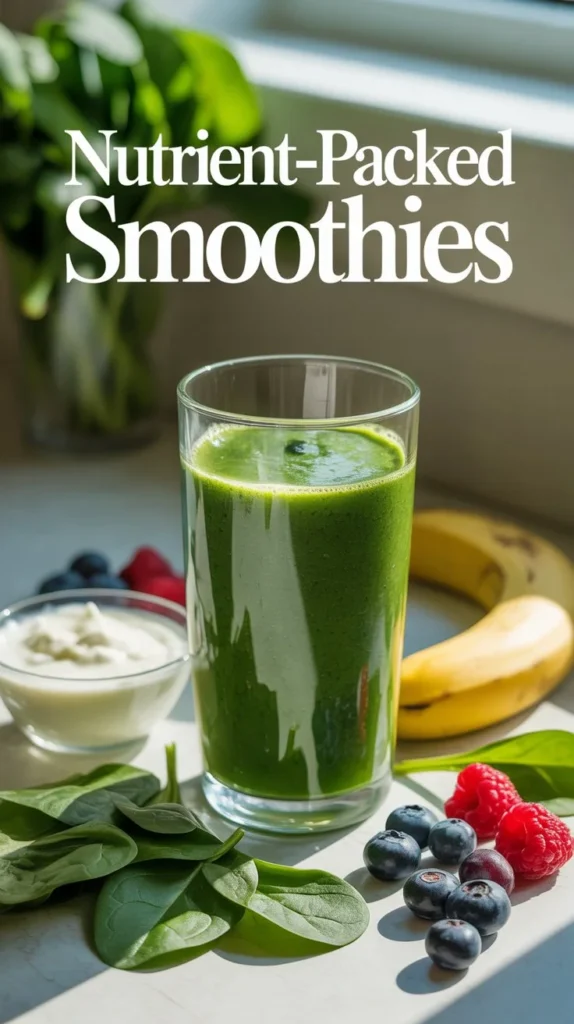
1.Nutrient-Packed Smoothies
Nutrient-packed smoothies are a quick, delicious way to fuel your body with vitamins, minerals, protein, and fiber all in one drink. These blended beverages combine leafy greens, frozen fruit, and creamy yogurt to create a satisfying meal or snack that tastes great while delivering serious nutrition. The natural sweetness of banana and berries masks the flavor of spinach or kale, making it easy to get more vegetables into your diet. Perfect for busy mornings, post-workout recovery, or afternoon energy boosts, these smoothies blend in minutes and provide sustained energy.
Ingredients:
- Spinach or kale
- Frozen banana
- Frozen berries
- Milk or almond milk
- Greek yogurt
- Ice cubes
Recipe Steps:
Step 1: Layer Ingredients in Blender Put 1 cup of fresh spinach or kale in your blender first for smoother blending. Add 1 frozen banana broken into chunks, half a cup of frozen berries, half a cup of milk or almond milk, and 2 tablespoons of Greek yogurt.
Step 2: Add Ice Add 3 ice cubes to create thickness and a cold, refreshing texture.
Step 3: Blend on Low Speed Start blending on low speed for about 10 seconds to break down larger pieces and prevent the blender from getting stuck.
Step 4: Blend on High Until Smooth Switch to high speed and blend for 30 to 45 seconds until no chunks remain. The smoothie should look creamy, smooth, and uniform in color.
Step 5: Serve Immediately Pour into a glass and drink right away for best taste and texture. Store leftovers in the fridge for up to 8 hours, shaking well before drinking.
2.Baked Goods with Hidden Vegetables
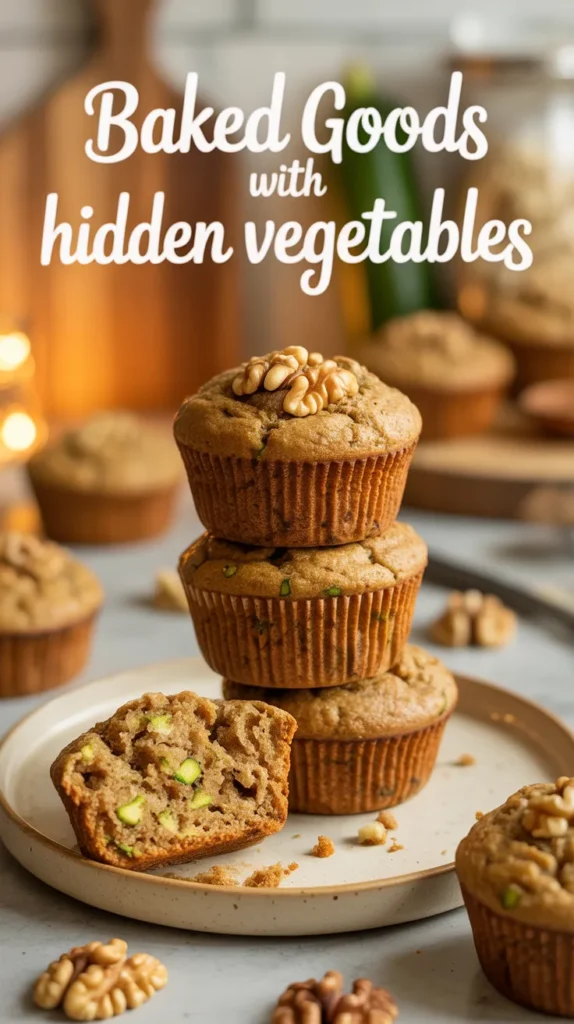
Baked goods with hidden vegetables are a clever way to add extra nutrition to your favorite treats without compromising on taste or texture. By incorporating grated zucchini into muffins, breads, or cakes, you boost the fiber, vitamins, and moisture content while keeping the baked goods incredibly soft and delicious. The mild flavor of zucchini disappears completely when mixed with sweet ingredients like honey and warm spices like cinnamon, making it perfect for picky eaters or anyone looking to sneak more vegetables into their diet. These wholesome baked goods are ideal for breakfast, snacks, or lunchboxes, and they stay fresh for days thanks to the natural moisture from the vegetables.
Ingredients:
- Zucchini (grated)
- Whole wheat flour
- Eggs
- Honey or maple syrup
- Baking powder
- Cinnamon
- Walnuts (chopped)
- Vanilla extract
Recipe Steps:
Prepare the Zucchini Wash one medium zucchini and grate it using the large holes on a box grater. You need about 1 cup of grated zucchini. Squeeze the grated zucchini in a clean kitchen towel to remove extra water. This step keeps your muffins from getting soggy.
Mix Wet Ingredients Crack 2 eggs into a large bowl and whisk them. Add a quarter cup of honey and a teaspoon of vanilla extract. Stir in the squeezed zucchini and mix everything together.
Combine Dry Ingredients Put 1 and a half cups of whole wheat flour in another bowl. Add 2 teaspoons of baking powder, 1 teaspoon of cinnamon, and a pinch of salt. Stir the dry ingredients with a fork to spread them evenly.
Bake the Muffins Heat your oven to 350°F. Pour the wet ingredients into the dry ingredients and stir just until combined. Don’t overmix or the muffins turn tough. Fold in a handful of chopped walnuts. Spoon the batter into lined muffin tins, filling each cup two-thirds full. Bake for 20 minutes until a toothpick comes out clean. Let muffins cool for 10 minutes before eating. Store in an airtight container for 4 days or freeze for 2 months.
3.Whole Grain Crackers with Fresh Toppings
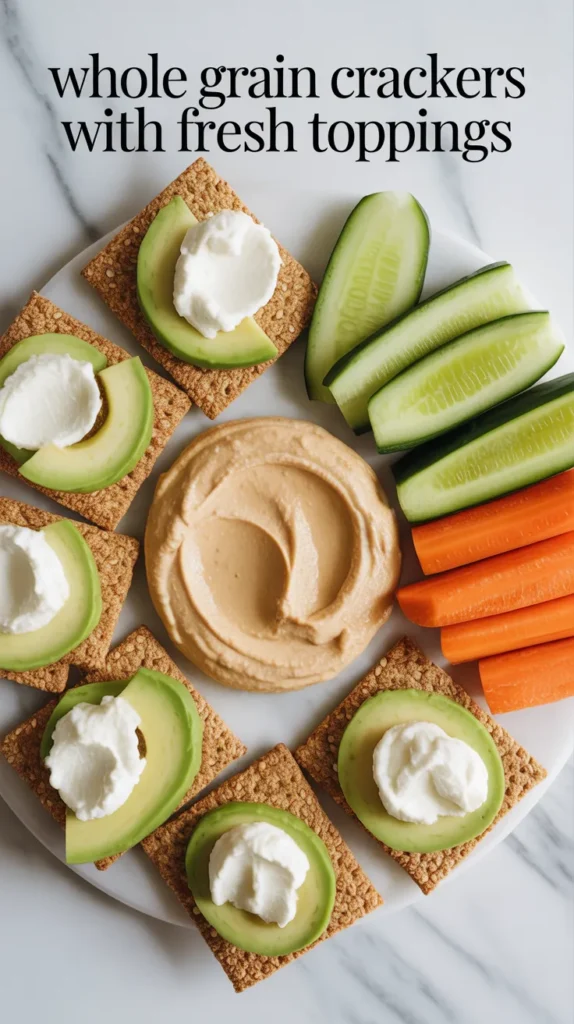
Whole grain crackers with fresh toppings are a versatile, satisfying snack that combines crunchy whole grains with creamy, flavorful ingredients for a perfect balance of textures and nutrients. These customizable mini meals are packed with fiber, healthy fats, and protein, making them ideal for keeping hunger at bay between meals or serving as light appetizers at gatherings. The beauty of this snack lies in its endless variety—you can mix and match toppings based on your preferences, what’s in your fridge, or your nutritional needs. Quick to assemble and requiring no cooking, these topped crackers are perfect for busy days, office snacks, or anytime you need something wholesome and delicious in minutes.
Ingredients:
- Whole grain crackers or rice cakes
- Avocado
- Cherry tomatoes
- Ricotta cheese
- Cucumber slices
- Hummus
- Red onion (thinly sliced)
Recipe Steps:
Prepare Your Base Arrange 6 to 8 whole grain crackers on a plate. Pick crackers that feel sturdy enough to hold toppings without breaking. Rice cakes work great if you want something bigger.
Create Avocado Crackers Mash half an avocado in a small bowl with a fork. Spread the mashed avocado on 2 crackers. Top each one with thin tomato slices and a few pieces of red onion. Sprinkle with salt and black pepper.
Make Ricotta Crackers Spread a tablespoon of ricotta cheese on 2 crackers. Place thin cucumber rounds on top of the ricotta. Add a small basil leaf if you have it. These taste cool and refreshing.
Build Hummus Crackers Spread hummus on the remaining crackers. Top with shredded carrots or sliced radishes for extra crunch. Eat these snacks within 20 minutes after making them so the crackers stay crispy. The toppings make crackers soggy if they sit too long.
Also Check: keto diet meal plan
4.Trail Mix with Dried Fruits
This trail mix with dried fruits is a simple, wholesome snack that delivers the perfect balance of natural sweetness, crunch, and energy. Made with nutrient-rich dried fruits, crunchy nuts, and seeds, it’s ideal for busy days, workouts, or whenever hunger strikes between meals. Each handful provides fiber, healthy fats, and lasting energy—plus a touch of dark chocolate if you want a little indulgence without guilt.
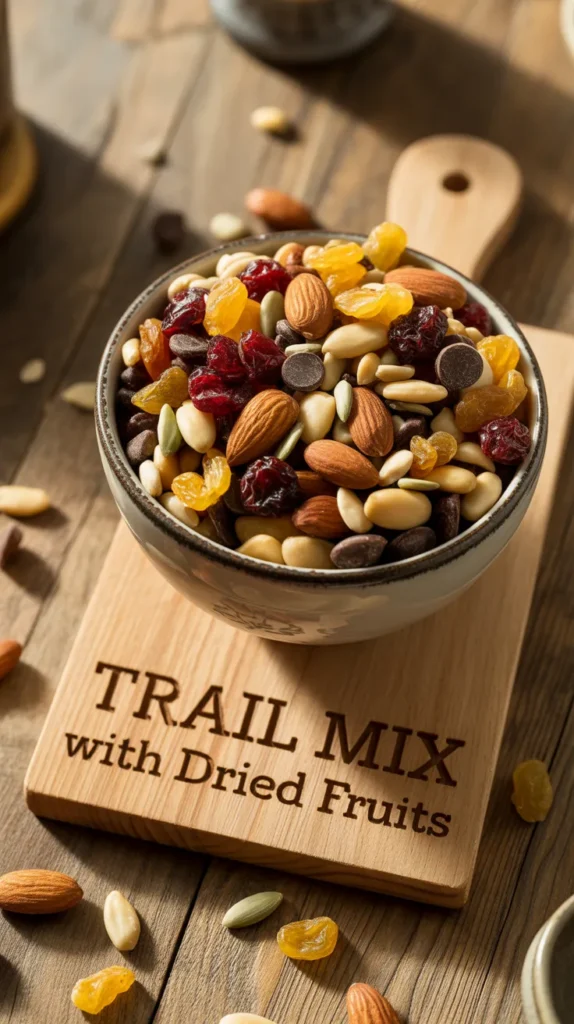
Ingredients:
- Dried apricots
- Raisins
- Dried cranberries
- Raw almonds
- Cashews
- Pumpkin seeds
- Dark chocolate chips (optional)
Recipe Steps:
Chop Large Pieces Cut dried apricots into small pieces using kitchen scissors. This makes them easier to eat and helps them mix better with other ingredients. Leave raisins and cranberries whole.
Measure and Mix Put a quarter cup of each dried fruit in a large bowl. Add a quarter cup each of almonds, cashews, and pumpkin seeds. If you want a sweet treat, throw in 2 tablespoons of dark chocolate chips. Stir everything together with a spoon until all ingredients spread out evenly.
Portion and Store Scoop the trail mix into small containers or resealable bags. Each portion should be about a third of a cup, which gives you energy without too many calories. Keep portions in your pantry for up to 3 weeks or in the fridge for 2 months. Grab a bag when you head out the door for work, school, or errands. This snack travels well and never needs refrigeration.
Final thoughts:
Choosing fruits and vegetables as your go-to snacks is one of the simplest ways to support better energy, digestion, and overall health without feeling restricted. As these quick recipes show, healthy snacking doesn’t have to be boring or time-consuming—just a little preparation can turn fresh produce into flavorful, satisfying bites you’ll actually look forward to eating. By swapping processed snacks for colorful fruits and veggies, you nourish your body with real nutrients, stay full longer, and build habits that are easy to maintain long term. Small snack choices add up, and fruits and vegetables make those choices both delicious and smart.